this is a test page
Add and Organize Your Contacts
This is no longer a test page
2. Navigate to the 'Contacts' section.
Navigate to the 'Contacts' section.
3.
4. This section is where contacts and newsletter subscribers are listed for managing data and tracking engagement.
5. Form Contacts: Entries collected from forms.
The Form Contacts tab displays information collected from forms.
6. Next is the 'Newsletter Subscribers' tab.
7. Newsletter Subscribers: Displays email sign-ups and details.
The Newsletter Subscribers tab shows email sign-ups and relevant details.
8. Then the 'All Contacts' tab.
9. All Contacts: Combines form entries and newsletter subscribers in one list.
The All Contacts tab provides a unified view of both form respondents and newsletter subscribers, allowing for easy access and organization.
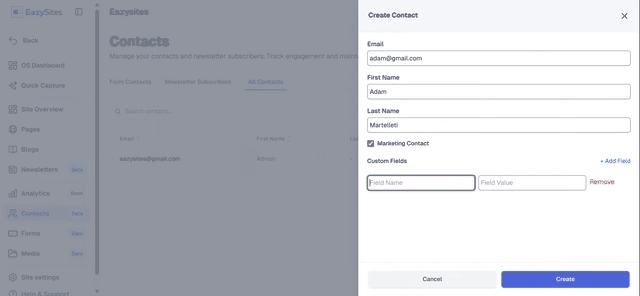
10. Click on 'Create Contact'.
To add a contact, click on 'Create Contact'.
12. Enter the necessary information.
Enter the necessary information
Enter the email address.
Enter the first name.
Enter the last name.
Make a marketing contact (Coming Soon)
To have the ability to send an email to a contact they need to be marked as a marketing contact.
Click on 'Marketing Contact' if consent is given for promotional emails.
Enable the Marketing Consent option to if the contact agrees to receive promotional emails and marketing communications.
20. Add a custom field.
You may add a custom field to personalize your contact's information.
21. Field Name: Defines the category of information to be stored.
Field name is the label used to describe the category of information being added.
22. For example, use the field name “Subscription Plan” to track which service tier a contact is enrolled in.
23. Field Value: The specific detail entered for the field name.
24. Since the field name is “Subscription Plan,” the example value may be “Gold,” which reflects the contact’s current subscription.
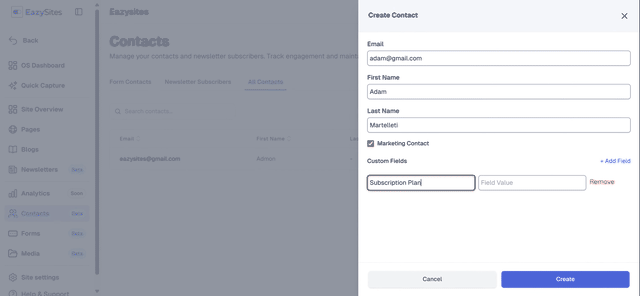
25. Click 'Create' to save.
Click 'Create' to save contact.
26.
27. Preview contact.
Click on 'Preview' to see the complete details of the contact.
28.
29. Click on 'View Contact' to see the full details and access options to edit or delete the entry.
Click on 'View Contact' to see the full details and access options to edit or delete the entry.
30.
31. This section shows the contact’s details, status, the date the entry was created, and the date when it was last updated.
32. This section displays whether the contact has given marketing consent, along with the date it was recorded.
33. This shows the custom data added to this contact, based on the fields created.
34. Then the Actions tab shows options to edit or delete the contact or add them to a newsletter list.
35.
Written by Adam • Last updated: 9/29/2025